Hands-On Review
BIQU B1
Most of our printer reviews have centered around prosumer 3D printers with lots of features and capabilities. They’re a lot of fun to review, and it’s certainly a growing segment in the desktop 3D printer market, but it is only one segment. Equally important is the hobbyist and entry-level segment, which is larger from a number-of-users perspective. That’s why I was glad to review the BIQU B1, a $300 printer that’s designed for hobbyists, educators, and crafters.


![]()

Unboxing and Assembly
3D printers come as either fully assembled, partially assembled, or as a kit that must be entirely assembled. The B1 is in the middle category where the base, electronics, and toolhead are already assembled, and the user just has to put the top frame together and attach it to the base. Selling printers this way drastically reduces shipping costs, which in turn allows the manufacturer to keep the price of the printer down. It arrives in a rather compact box with the base on the bottom layer and the frame components on top:
All we have to do is say the magic words “Automatica Assembliosa” and voilà!
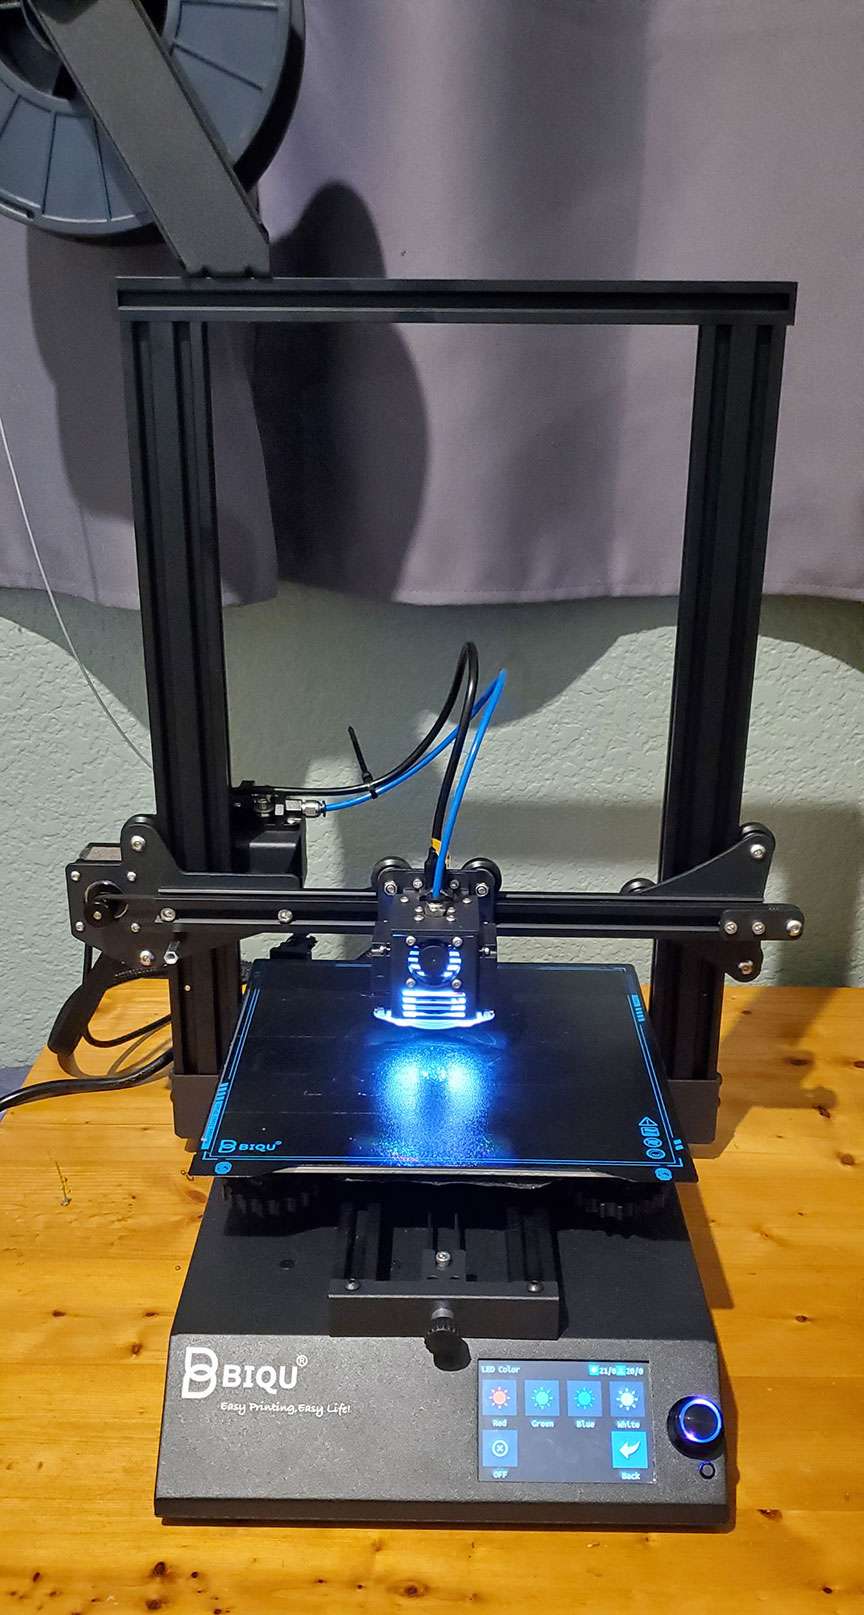

Ok, so it’s not quite that easy, but it was easy. It took just over an hour to put together, requiring only a couple included Allen wrenches. I have to give major kudos to BIQU for their assembly instructions, which are clearly documented with actual pictures (rather than diagrams), and all of the screws are labeled in separate bags, and none of the screws were missing (extra points). Additionally, and I can’t stress how important this is to me as a consumer, the assembly instructions are on a single two-sided page. A one-page set of instructions reassures me that I can handle this and don’t need to cancel all my plans for the day (or weekend), and I appreciate that reassurance. Assembling the printer let me see that the quality of the components is rather high, especially for the price point. All of the major components are thick, machined aluminum, and everything fits together snugly. The motion of the V-rails is incredibly smooth. And it all comes together for a sleek, industrial look.
Calibrating the printer was even easier as it consisted only of leveling the bed. The leveling function sends the toolhead to a corner of the bed and on-screen prompts instruct you to slide a piece of paper between the nozzle and the bed while adjusting the knob under the current position until there’s a bit of resistance; when the first corner is correct, you push the button on the screen and the toolhead goes to the next corner, repeating the process until all four corners have been adjusted. This is my favorite method of leveling a bed because it’s so quick and reliable. The B1 comes with a bracket and accessible plug outlet to add a BL Touch for automatic leveling but I like it as is.
The Tests
After leveling, it was time to get printing, and you know what that means: Benchy! All of the prints in this review were sliced in Cura as B1 profiles have been added to the latest version. I made minor adjustments to temperatures (from 180°C to 200°C for PLA) and flow rates (from 100% to 94% for PLA) but otherwise I used mostly default settings.


Well that is a mighty fine first print for having come out of a printer that was a box of parts just an hour prior. I’ve had worse first prints come out of printers that came fully assembled. The walls are smooth, pillars are straight, and the smokestack is clean. The issues that are present aren’t very bad, just some minor imperfections on the steepest overhangs. Next up was a 20mm Calibration Cube to see how accurate this printer is out of the box.
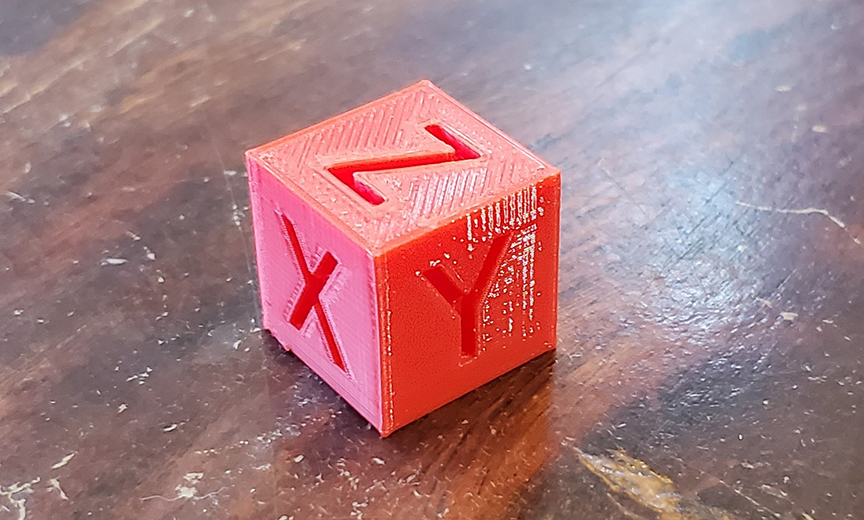

Its measured dimensions are: X – 20.12mm; Y – 20.08mm; and Z – 19.9mm. That’s an accuracy of +/-0.6% on a small object, quite good for a $300 printer. I printed the Bridging Test next.
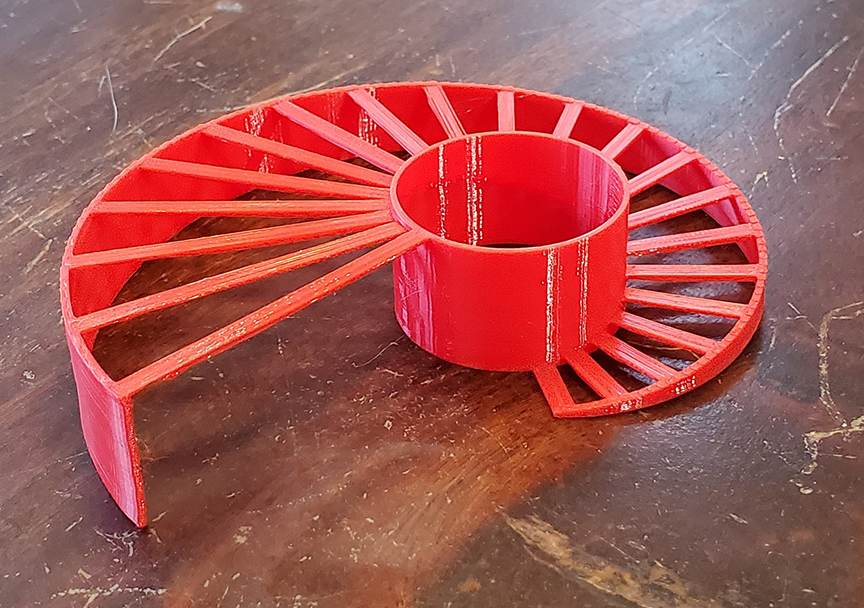

It’s basically flawless. There are no missed lines and virtually no drooping. Quite impressive. I changed to a less glossy PLA for the All In One 3D Printer Test.
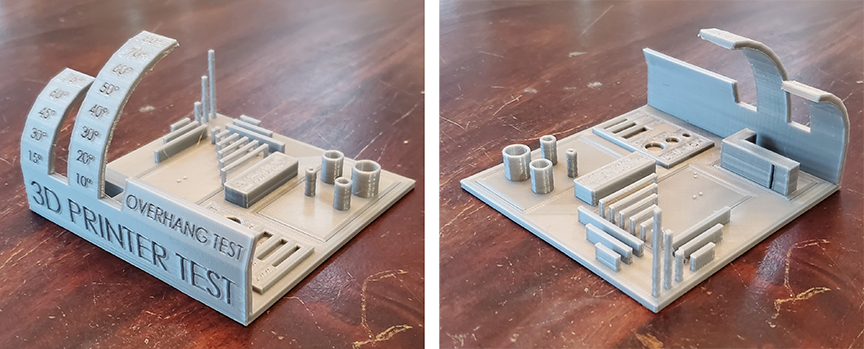

As expected, the results are very good. The text is clearly legible, top surfaces are solid, thin walls are sturdy, and the pillars are straight, though a bit stringy and out of focus. The most noticeable imperfections are again on the steepest overhangs over 70° as the part cooling seems to be a bit lacking.
My nephew is currently into Mario so I figured this was a good time to print something larger with the Mario Coin Box.
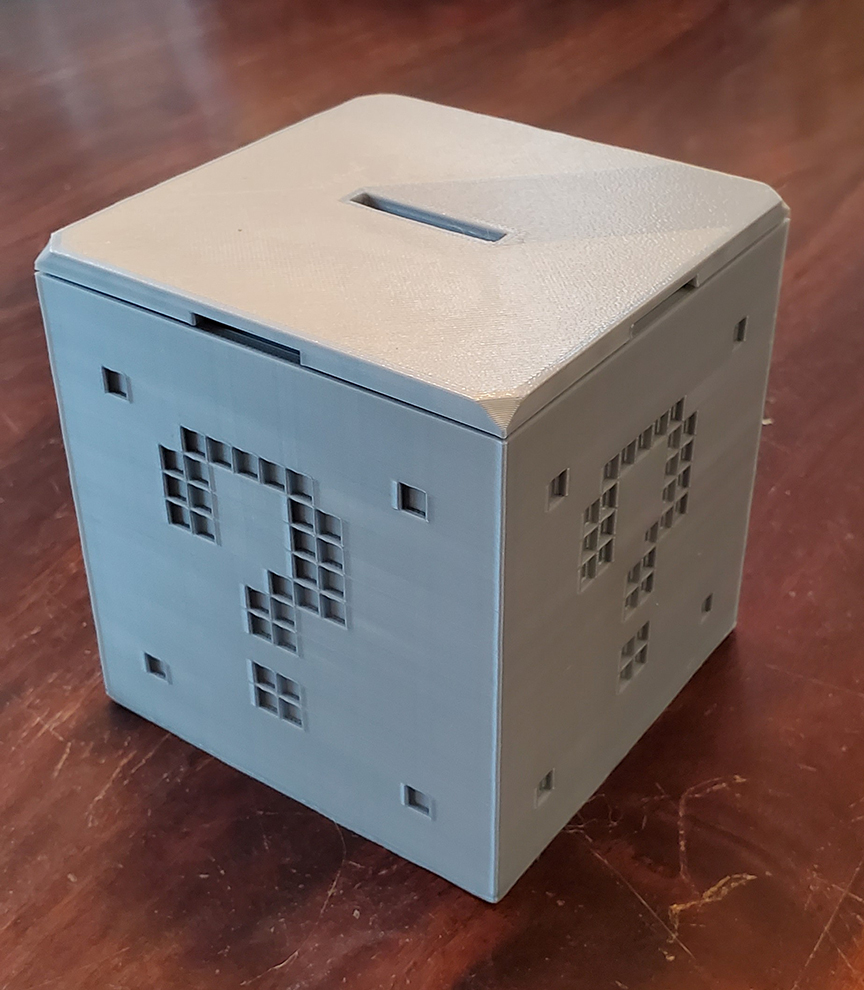

This took about 17 hours to print as two parts and the lid snaps tightly onto the box, which will hopefully deter my nephew from opening it every time he wants a candy bar. I like the eggshell texture that the bed imprinted onto the lid. One of my favorite prints is the Machine Canister that tests print-in-place moving parts.
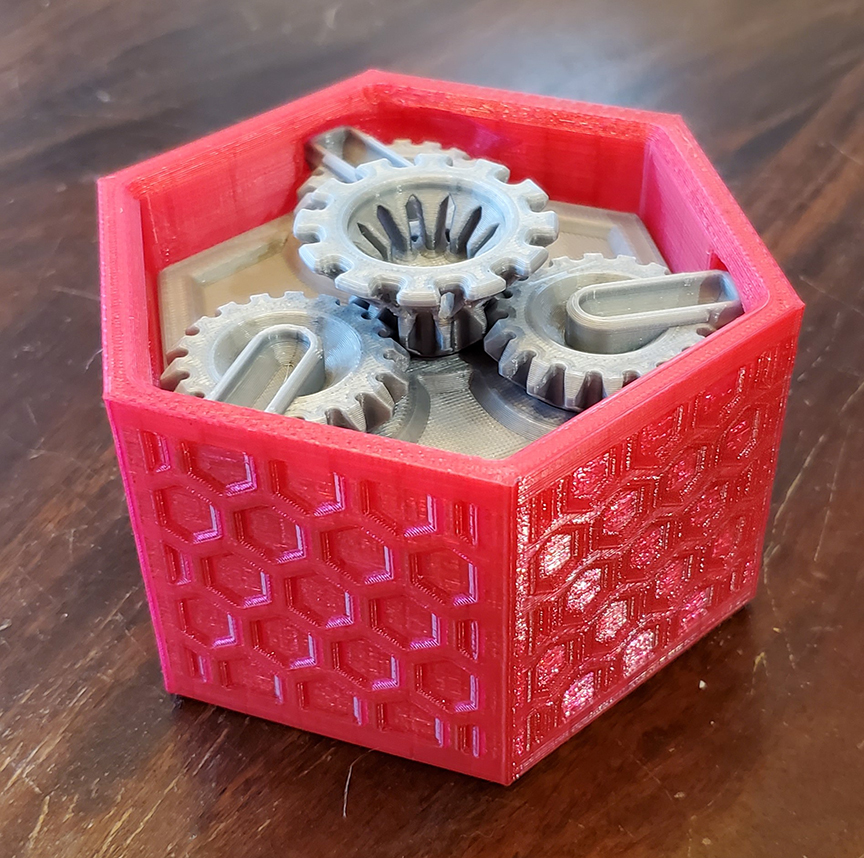

The lid printed without issue and the gears turn easily without resistance. This is also when I moved on to testing other materials as the main part of the canister was printed in PETG. It also printed well on the first try. That’s when I really started to like the textured SSS (super spring steel) bed surface that’s magnetic and flexible; so far I’d printed two materials without any changes to the bed, and removing parts is a breeze. I’m glad BIQU doesn’t include a spatula in the accessories bag because they’re no longer necessary for removing prints and generally cause more harm than good these days. Next I tried some ABS for this bust of Darkness from the movie Legend.
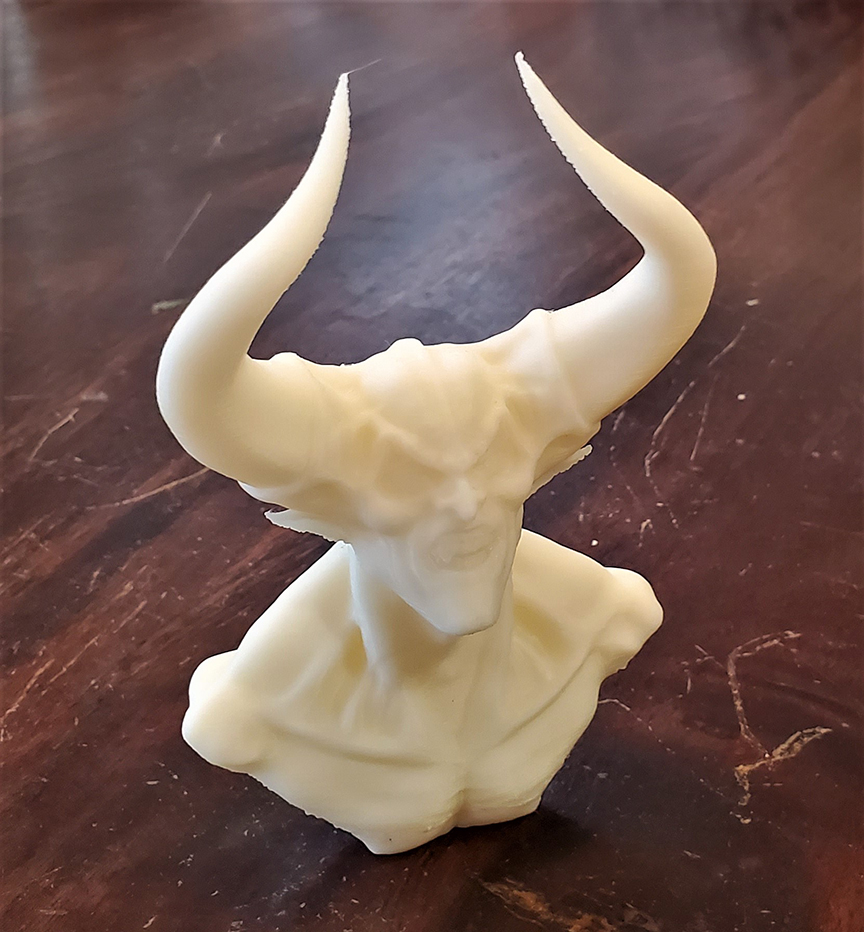

You can see where the layers didn’t have adequate time to cool at the tops of the horns, but otherwise it looks great with 0.15mm layers. Initially, I tried printing the canister in ABS, and while it printed just fine, the layers delaminated due to not having an enclosure. But a smaller object like this with thicker walls is easily printed in ABS on this machine, and again on the same unmodified print surface. Next up was TPU, tested on this Random Octopus Generator.
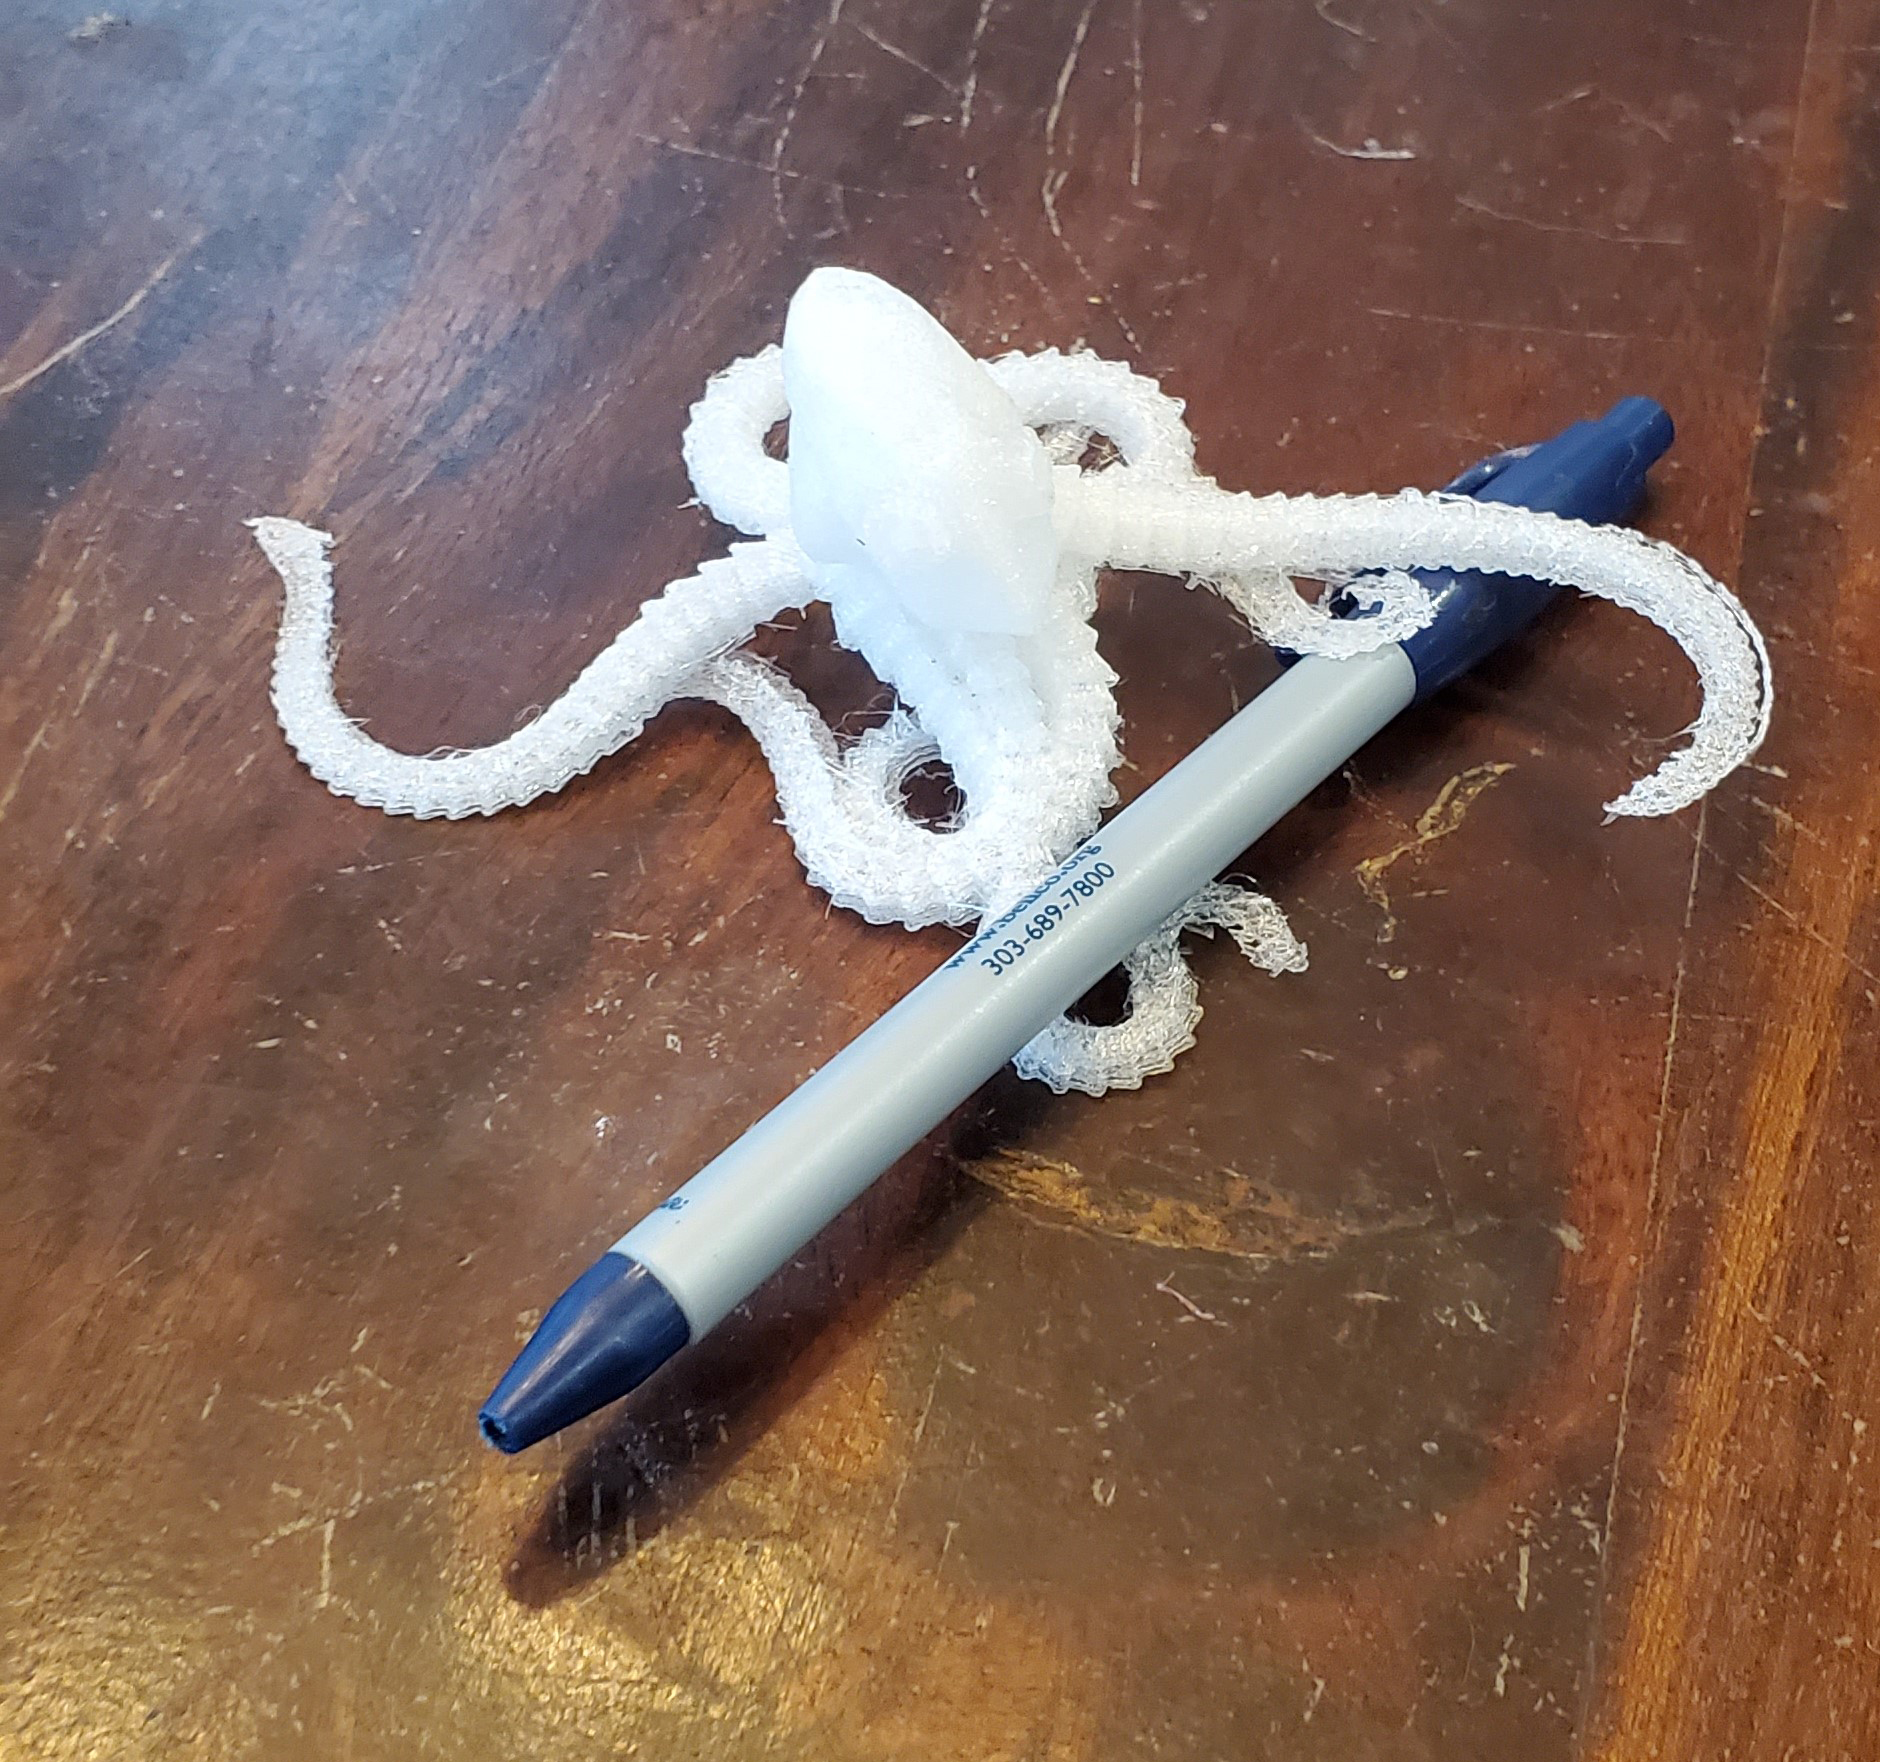

I don’t know why I choose such complicated objects for TPU, but even so it worked out decently. There’s some stringing but that’s nothing that can’t be fixed with some changes to the print settings. TPU sticks to the SSS bed more than all the other materials tested. Finally, even though it isn’t really designed or rated for it, I wanted to try Nylon on this machine since it handled ABS so well. I needed another strong Door Opener anyway.
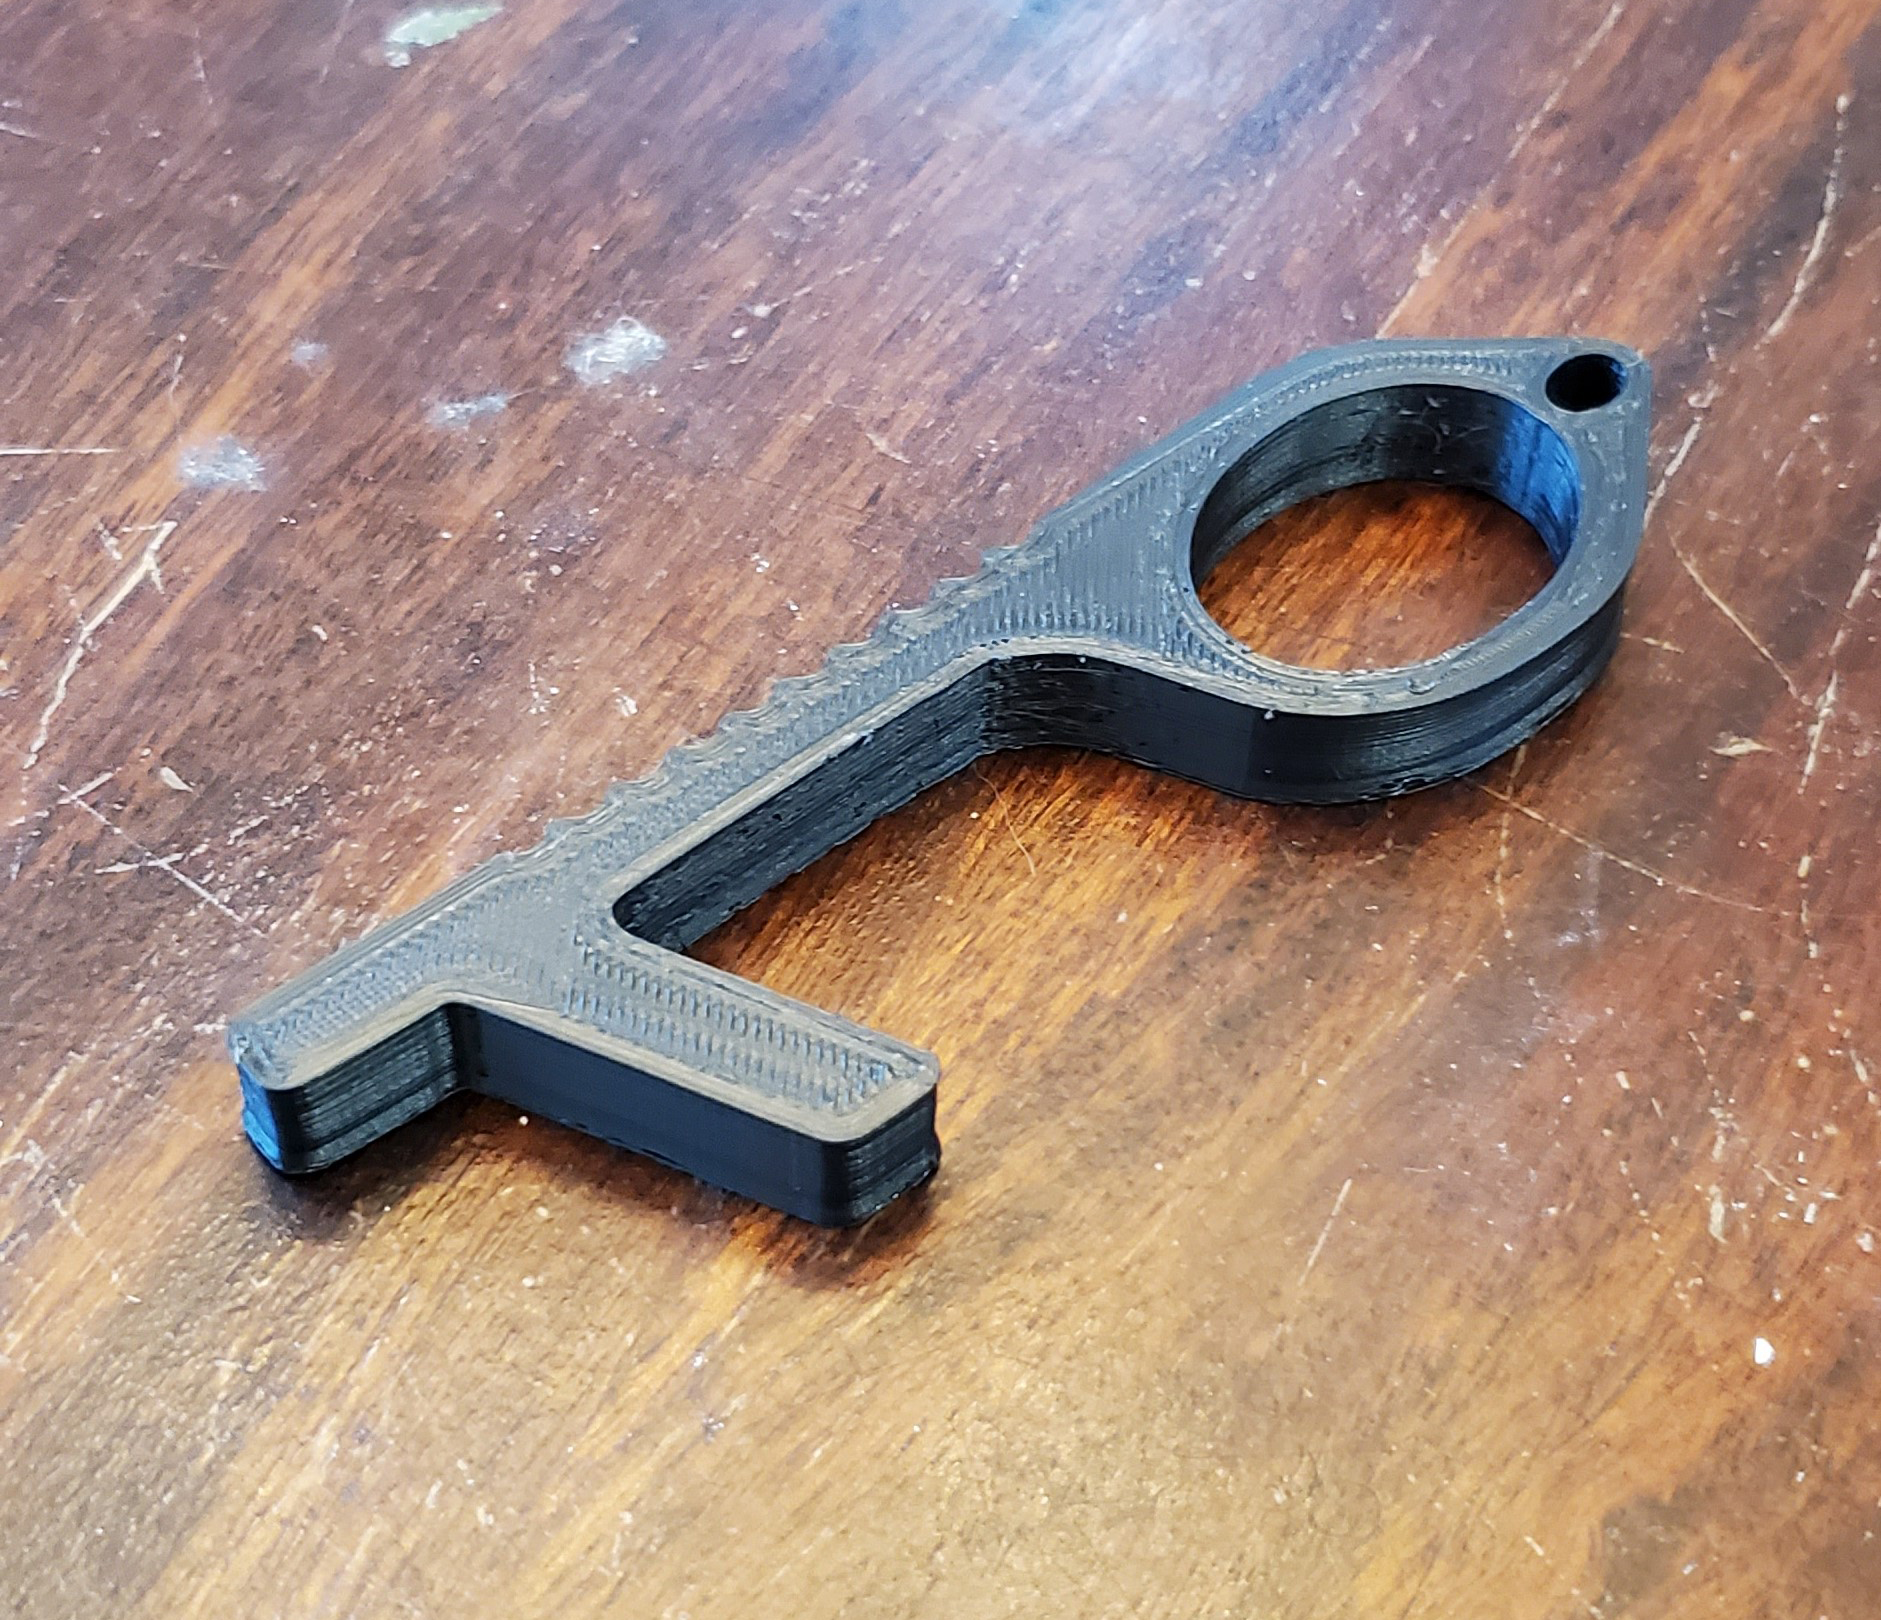

Success on the first attempt. There’s some evident “elephant’s foot” happening as the layers closest to the bed are the only ones getting the appropriate heat, so all the other layers shrink a bit in comparison. As with ABS, printing large parts with Nylon would be difficult, but small parts are definitely doable. It should be noted that Nylon is an abrasive material and the B1 comes with a brass nozzle, which would wear down with continued printing of Nylon. It’s really cool that a nozzle change is all that’s needed to regularly print with Nylon, and on the same bed. That’s five materials all on the same bed surface!
Conclusion
I like this printer a lot. It feels like it’s worth more than $300. It prints Nylon! The build quality is fantastic, despite the fact that I assembled parts of it. It has several premium features that don’t have to be included on a printer at this price point, like V-rails, filament runout detection and print resume (which I tested and they work), and a magnetic removable bed. You already know how I feel about the bed. Did I mention that it heats up quickly? The touchscreen is very responsive and quick, more so than more expensive printers. The overall print quality is very good. And it has a fairly large build volume at 235mm x 235mm x 270mm. The things that I don’t like are certainly not deal breakers: no enclosure, the part cooling is slightly underpowered, loading filament was occasionally frustrating because of a small gap between the drive gear and the feed tube, and while the printing is almost silent thanks to the quality drivers and motion system, the printer itself is kind of noisy because of the electronics cooling fan in the base. I would definitely recommend this printer to hobbyists, those who are just getting into 3D printing, and even to someone wanting to start a budget print farm.