One of my favorite parts (okay, my favorite part) of being a 3D printing blogger is reviewing 3D printers because it lets me provide something that I really wanted when I was shopping for my first printer: a (somewhat) standardized, hands-on look at the performance and functionality of printers at different price points. We’ve provided in-depth reviews of 3D printers in multiple price categories, ranging from $1,000 to $6,000, and we’re rounding it out with this review of the Flashforge Guider 2S, which is priced at $2,500.
Flashforge is a company that goes way back in the personal 3D printing space as their original Creator model was one of the most accessible dual-extruder printers in 2011. It was my first (good) 3D printer and I got several years of use out of it. They still make entry-level 3D printers; the Creator Max is the current model in that lineup. But Flashforge has also stepped into the professional and industrial-grade space of the 3D printing market, and that’s where they’ve placed the Guider 2S, an upgraded version of the Guider 2.
High-temp hotend
There are several notable facts and features that separate the Guider 2S from less expensive desktop machines. For one, the hotend goes up to 300°C, which is hot enough to handle most industrial plastics such as Nylon, ABS, and PC. The enclosed build chamber does a good job of maintaining a warm environment for those same materials that are prone to warping if they get hit with a draft of cool air.
Sturdy & heavy frame
Less noticeable but equally important is the solid construction of the printer. The first clue that this is a sturdy printer is that it is heavy. 30kg of heavy. That’s partly because it’s a rather large printer and partly because it has an all-metal frame, and that’s one of the key factors that enable this printer to be accurate and reliable. For professionals, those are two critical requirements of any machinery.
Other key features
Beyond that, the Guider 2S sports many features found on other professional 3D printers, like a color touchscreen, Wifi connectivity, air filtration, a flexible build plate, video monitoring, and probe assisted bed levelling with an updated nine-point levelling system. But do all these features make the Guider 2S industrial-grade, or is it a consumer 3D printer with a few extra bells and whistles? Let’s find out!


Setup
Unboxing this printer was an absolute breeze compared to other printers I’ve opened. There are minimal foam inserts and they come out easily and cleanly. Lifting the printer out of the box is the hardest part only because of the aforementioned weight. The designers were thoughtful enough to include handles in the sides.
It is at least very professional looking, with a much more intentional design than much of the competition. The door has a magnetic latch as all doors of this type should. Not pictured here is the clear lid that sits on top to enclose the build chamber. The lid not only maintains a warm printing environment but also significantly reduces the noise of the printer. The only setup required is levelling the bed.


The Guider 2S has a bed levelling probe that assists with levelling. The printer probes different spots on the bed and prompts the user to turn the appropriate knob under the bed the appropriate direction. The machine beeps when the knob has been turned to the correct height and then moves on to the next point. There are only three knobs so the process doesn’t take long. The knobs are large and easy to access.
After the printer confirmed that the bed was level, I loaded the included PLA. Loading material into this printer is fairly easy, though not fully automatic. The filament must be inserted at the right angle to go into the extruder correctly, but most people who have worked with desktop 3D printers are accustomed to that. Spools from Flashforge snap perfectly onto the spool holder that attaches to the back of the printer; third-party spools fit but don’t snap in and will fall off. Though I found that positioning the printer close to a wall would keep those spools on, I still opted to use a universal spool holder when printing third-party materials.
I went ahead and tried to setup the Wifi and was pleasantly surprised at how fast and painless it was. It works just like it should. I then sliced Benchy in their FlashPrint software with default PLA settings (0.18mm) and told it to print over the network. It started to heat up immediately and took only a couple minutes before beginning to print. I almost didn’t know it was printing because it was so quiet. Unfortunately, the print wasn’t sticking to the build plate. The nozzle was just a bit too far away from the build plate. That was quite unexpected since a levelling probe was used. I looked at the slice parameters and the first layer was set to 0.27mm. So I changed that to 0.22mm, told it to print again, and it worked fine. I’m not sure if the issue is with the probe, the firmware, or the slice parameters, but it’d be an easy fix for Flashforge. I also don’t know if this is a common issue or if I just got unlucky with this specific test unit. Either way, it’s not that big of a deal to a user like me with a lot of printing experience where I could easily tell why the print was failing. To a completely inexperienced user, this may cause them some frustration and serve as their rite of passage into the prestigious club of 3D printer troubleshooting. But let’s see a print already!
Tests
I think that was worth the wait. That’s a fine looking Benchy, with a clean bow where there’s steep overhang, good bridging, straight pillars, and a smooth smokestack. I wanted to see what this printer could really do so I moved on to the All In One 3D Printer Test.

If that’s not the best print of that model that I’ve produced, it’s definitely in the top two. And that’s with just the standard 0.18mm print setting. We’ll get to some high-resolution prints later. The pillars are incredibly smooth and square, the bridges have no sag, the overhangs are very clean with all of the numbers legible, and the overall crispness is impressive. There are no signs or banding, ghosting, or other artifacts that are found on the prints of many consumer printers. Those types of issues are caused by a number of factors, but foremost among them are acceleration and deceleration limits imposed by the hardware. That means the torque of the motors, the strength of the belts, the rigidity of the frame, etc. It’s clear that the Flashforge engineers have considered such details, and the proof is in the pudding. You don’t get these kinds of results out of a printer that has a flimsy frame.
Even though I’m not reviewing the included material, I was curious how their software handles longer gaps with the Bridging Test.
And the answer is extremely well. That’s as good as it gets.
To test the accuracy of the printer I printed a 20mm Calibration Cube.
The dimensions of the print are: X axis – 20.2mm, Y axis – 20.17mm, Z axis – 20.13mm. That’s an average deviation of less than 1%, which is quite good for an object so small.
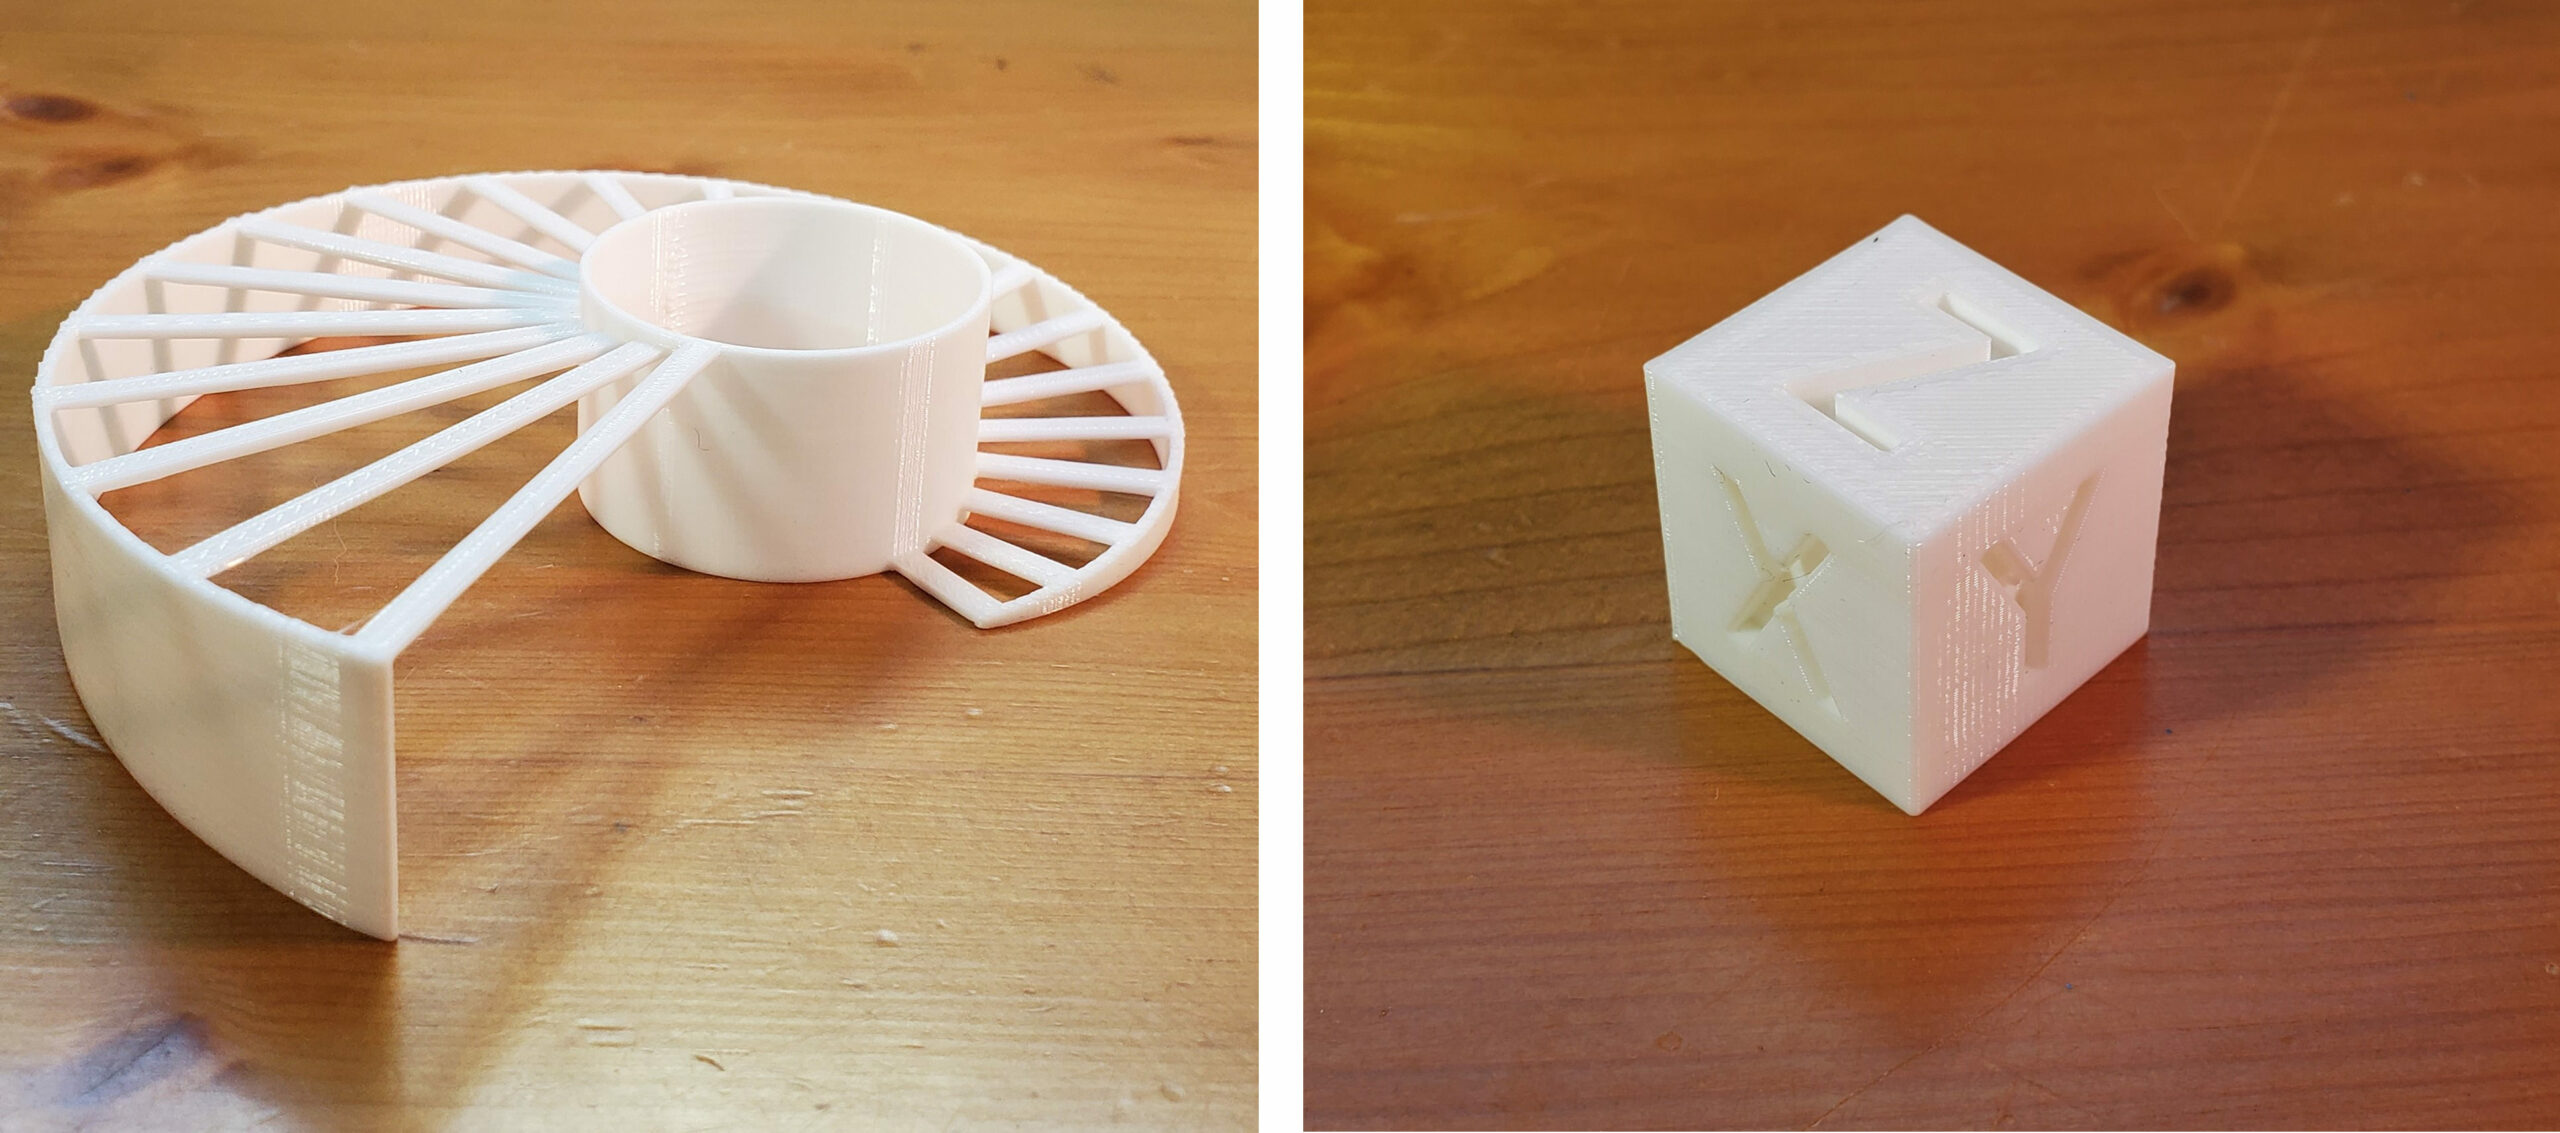
FlashPrint offers both treelike and linear support structures, which is a nice touch. I tested the treelike type on this Musical Frog as it prints best standing up on its tail like this:

It came out great, with the raft and supports coming off easily. And since this isn’t a PLA-only printer, I made the frog a friend in ABS, this time using the linear supports, though I forgot to take a picture before removing the supports.
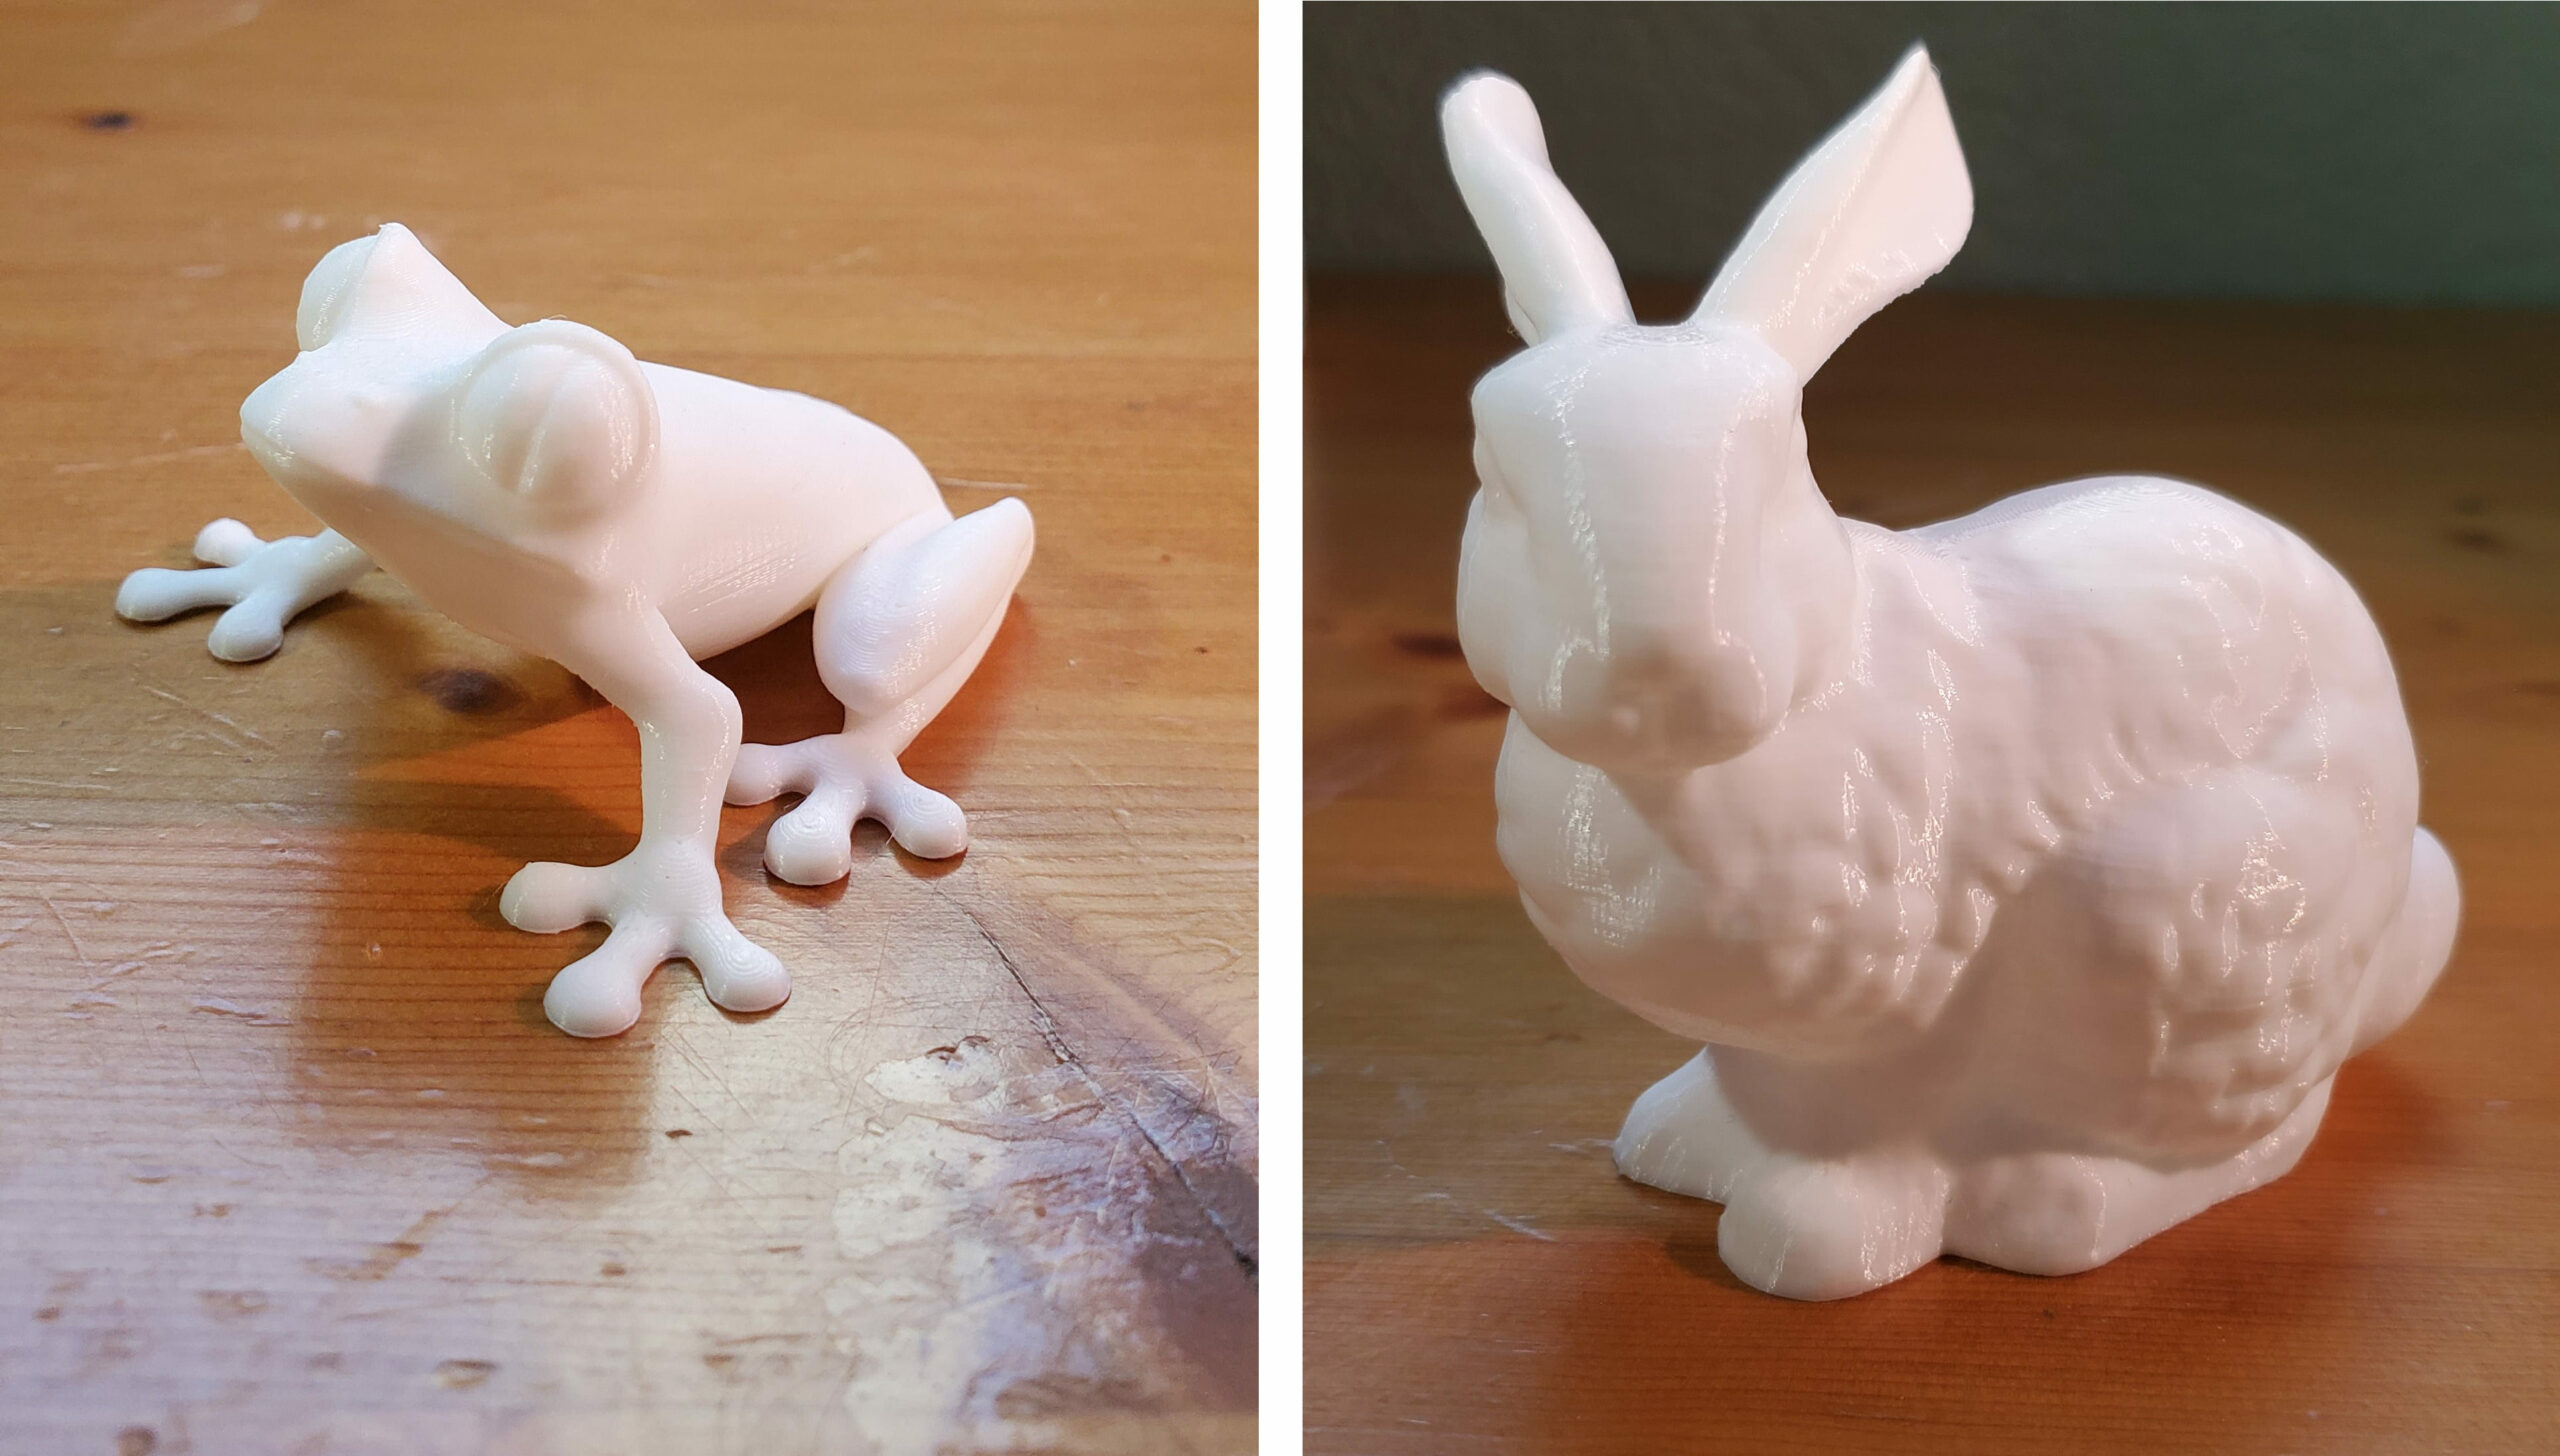
One of the great features of the Guider 2S is that it comes with two print surfaces: a removable, flexible one that has a replaceable textured surface as well as the glass bed that’s beneath the removable surface. All of the prints up until now were printed on the glass so it was time to test out the flexible surface. The removable surface attaches to the plate with magnets, which hold the bed in place but don’t seem very strong. So some standard office clips are included to help hold the surface in place. This first print was done with the clips on. At the same time, high-res print settings of 0.1mm were tested to print this Treefrog.
This treefrog is super clean. It’s incredibly smooth and has no tactile texture. This next print of the Stanford Bunny was done with the same settings but without the clips on the bed.
No problem there. This print is equally smooth. The printer documentation indicates that the clips prevent the flexible surface from warping at high temperatures, so it seems that the 60°C I was using for PLA wasn’t hot enough to cause issue. I didn’t want to keep trying to make the printer fail so this isn’t something I investigated further.
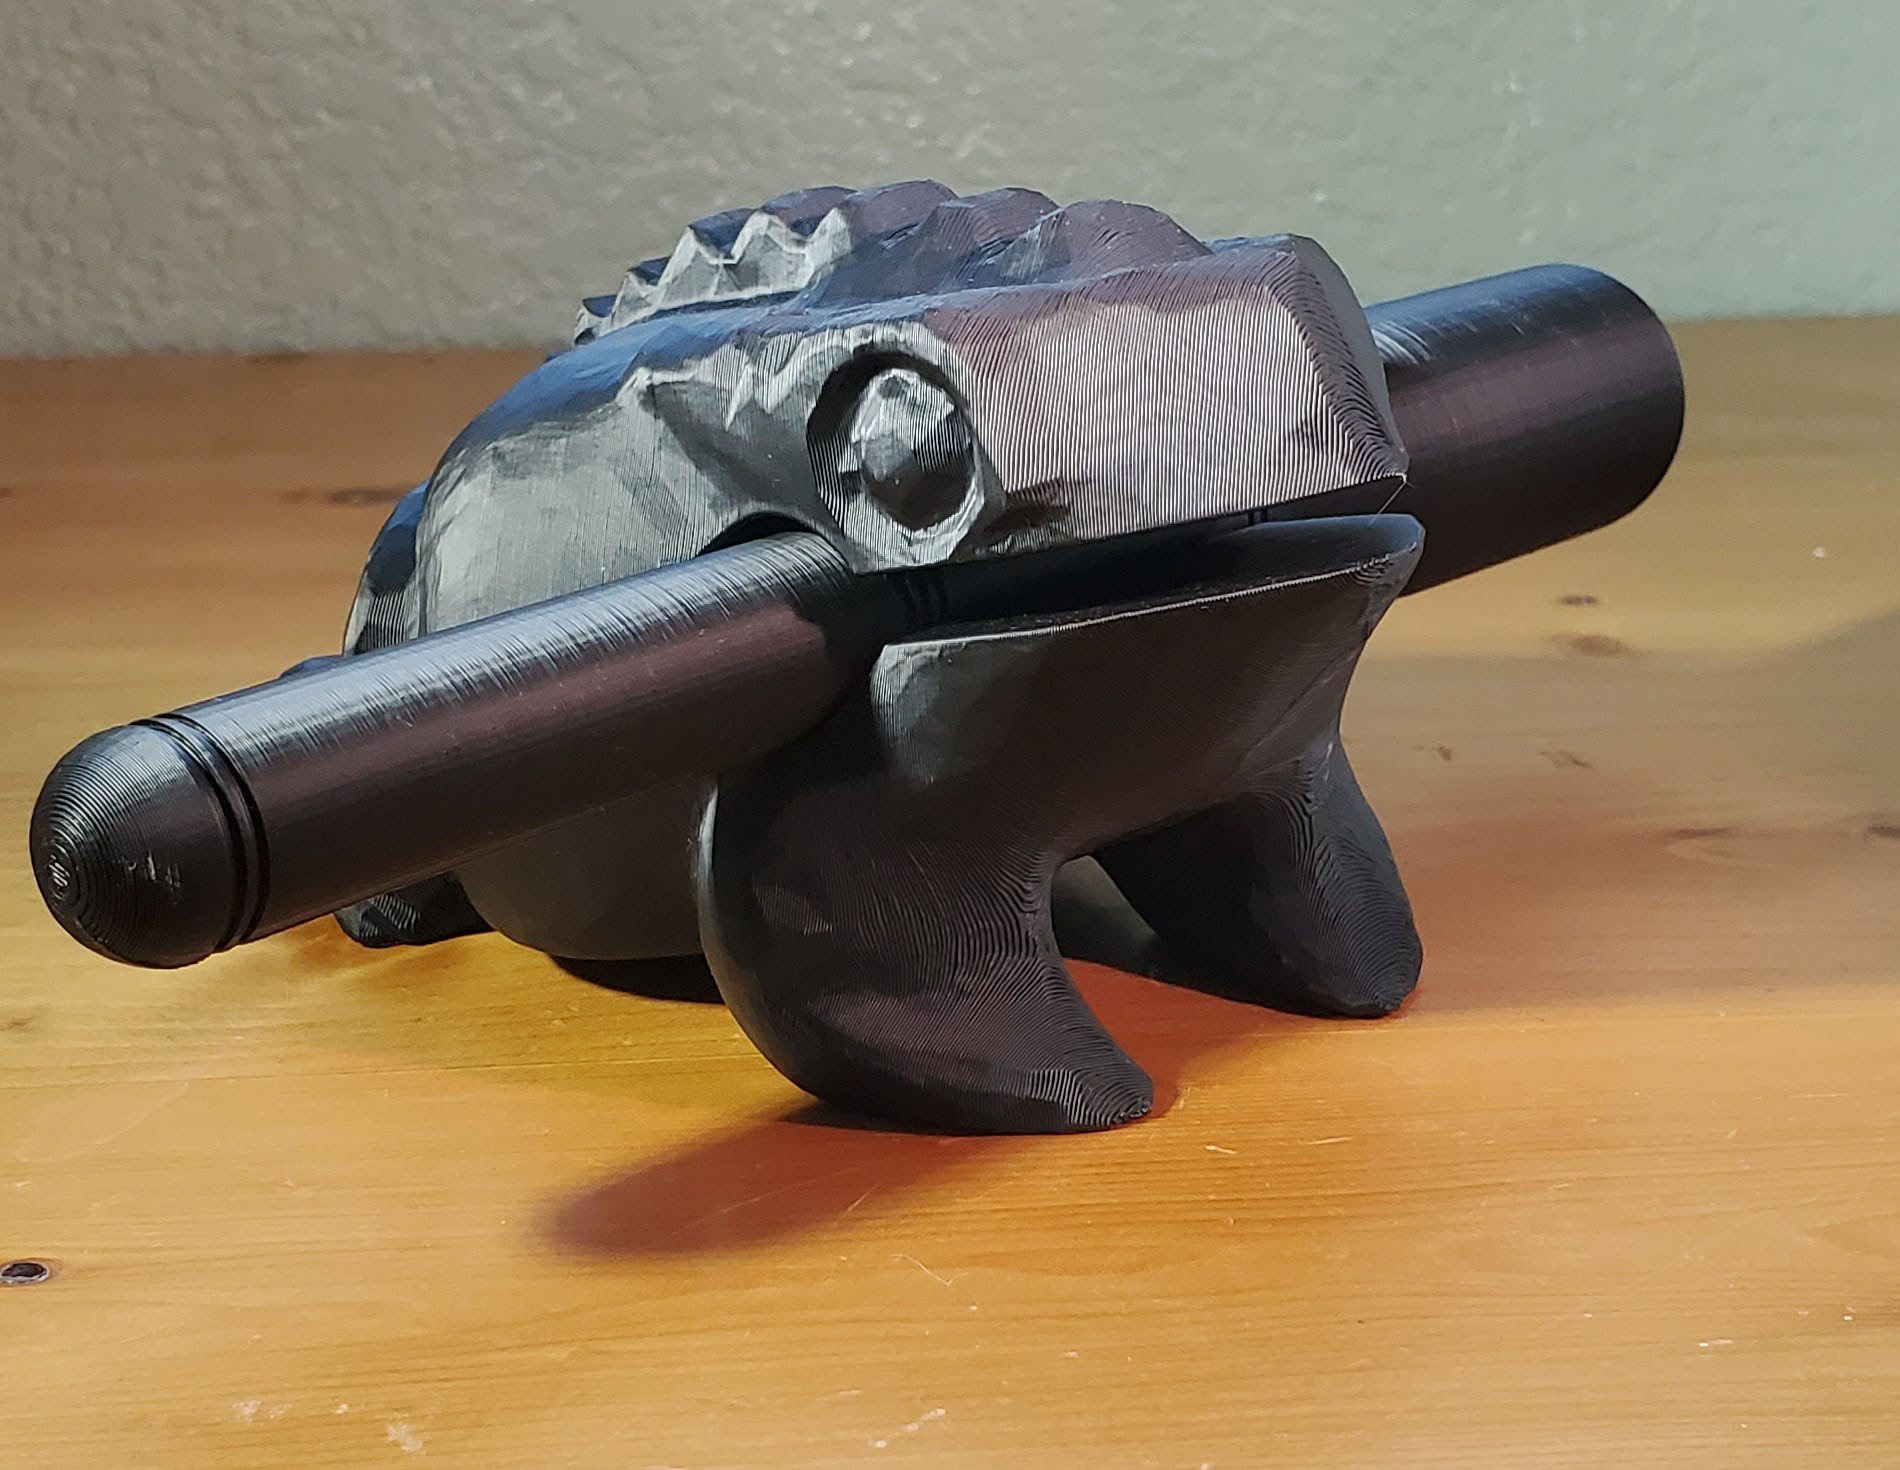
One of the big selling points of the Guider 2S is its wide material range so that’s what I explored next. Here’s a High Load Carabiner printed in Flashforge’s PACF (carbon fiber infused nylon) that easily held my brother’s weight of 130lbs.
This stuff prints at 280°C and is seriously stiff. It’s also surprisingly light. And it came out looking so nice that I had to see how something with some details would look. This Spiderman Bust was printed with 0.12mm layers.

PACF is the perfect material for this bust. The texture is absolutely fantastic. Usually, CF-infused nylon is a difficult material to print with, but all I had to do was swap the nozzle out with the included high-temp nozzle. And that took only a couple of minutes. Just as with all of the other materials I printed, default print settings were used on the material profile included in the FlashPrint software.


This felt like a good time to demonstrate the video monitoring feature. It works well, but requires logging into a cloud network through a browser. I’d prefer to be able to access the video through the FlashPrint software since it’s already connected over wifi. The cloud interface is also where prints can be queued up. It’s a bit clunky but it’s functional. Somehow, the printer doesn’t get confused by being connected to a cloud and a wifi network.
Next I tried some PETG. I like the optical effects of PETG so I printed this beautiful Geode City.
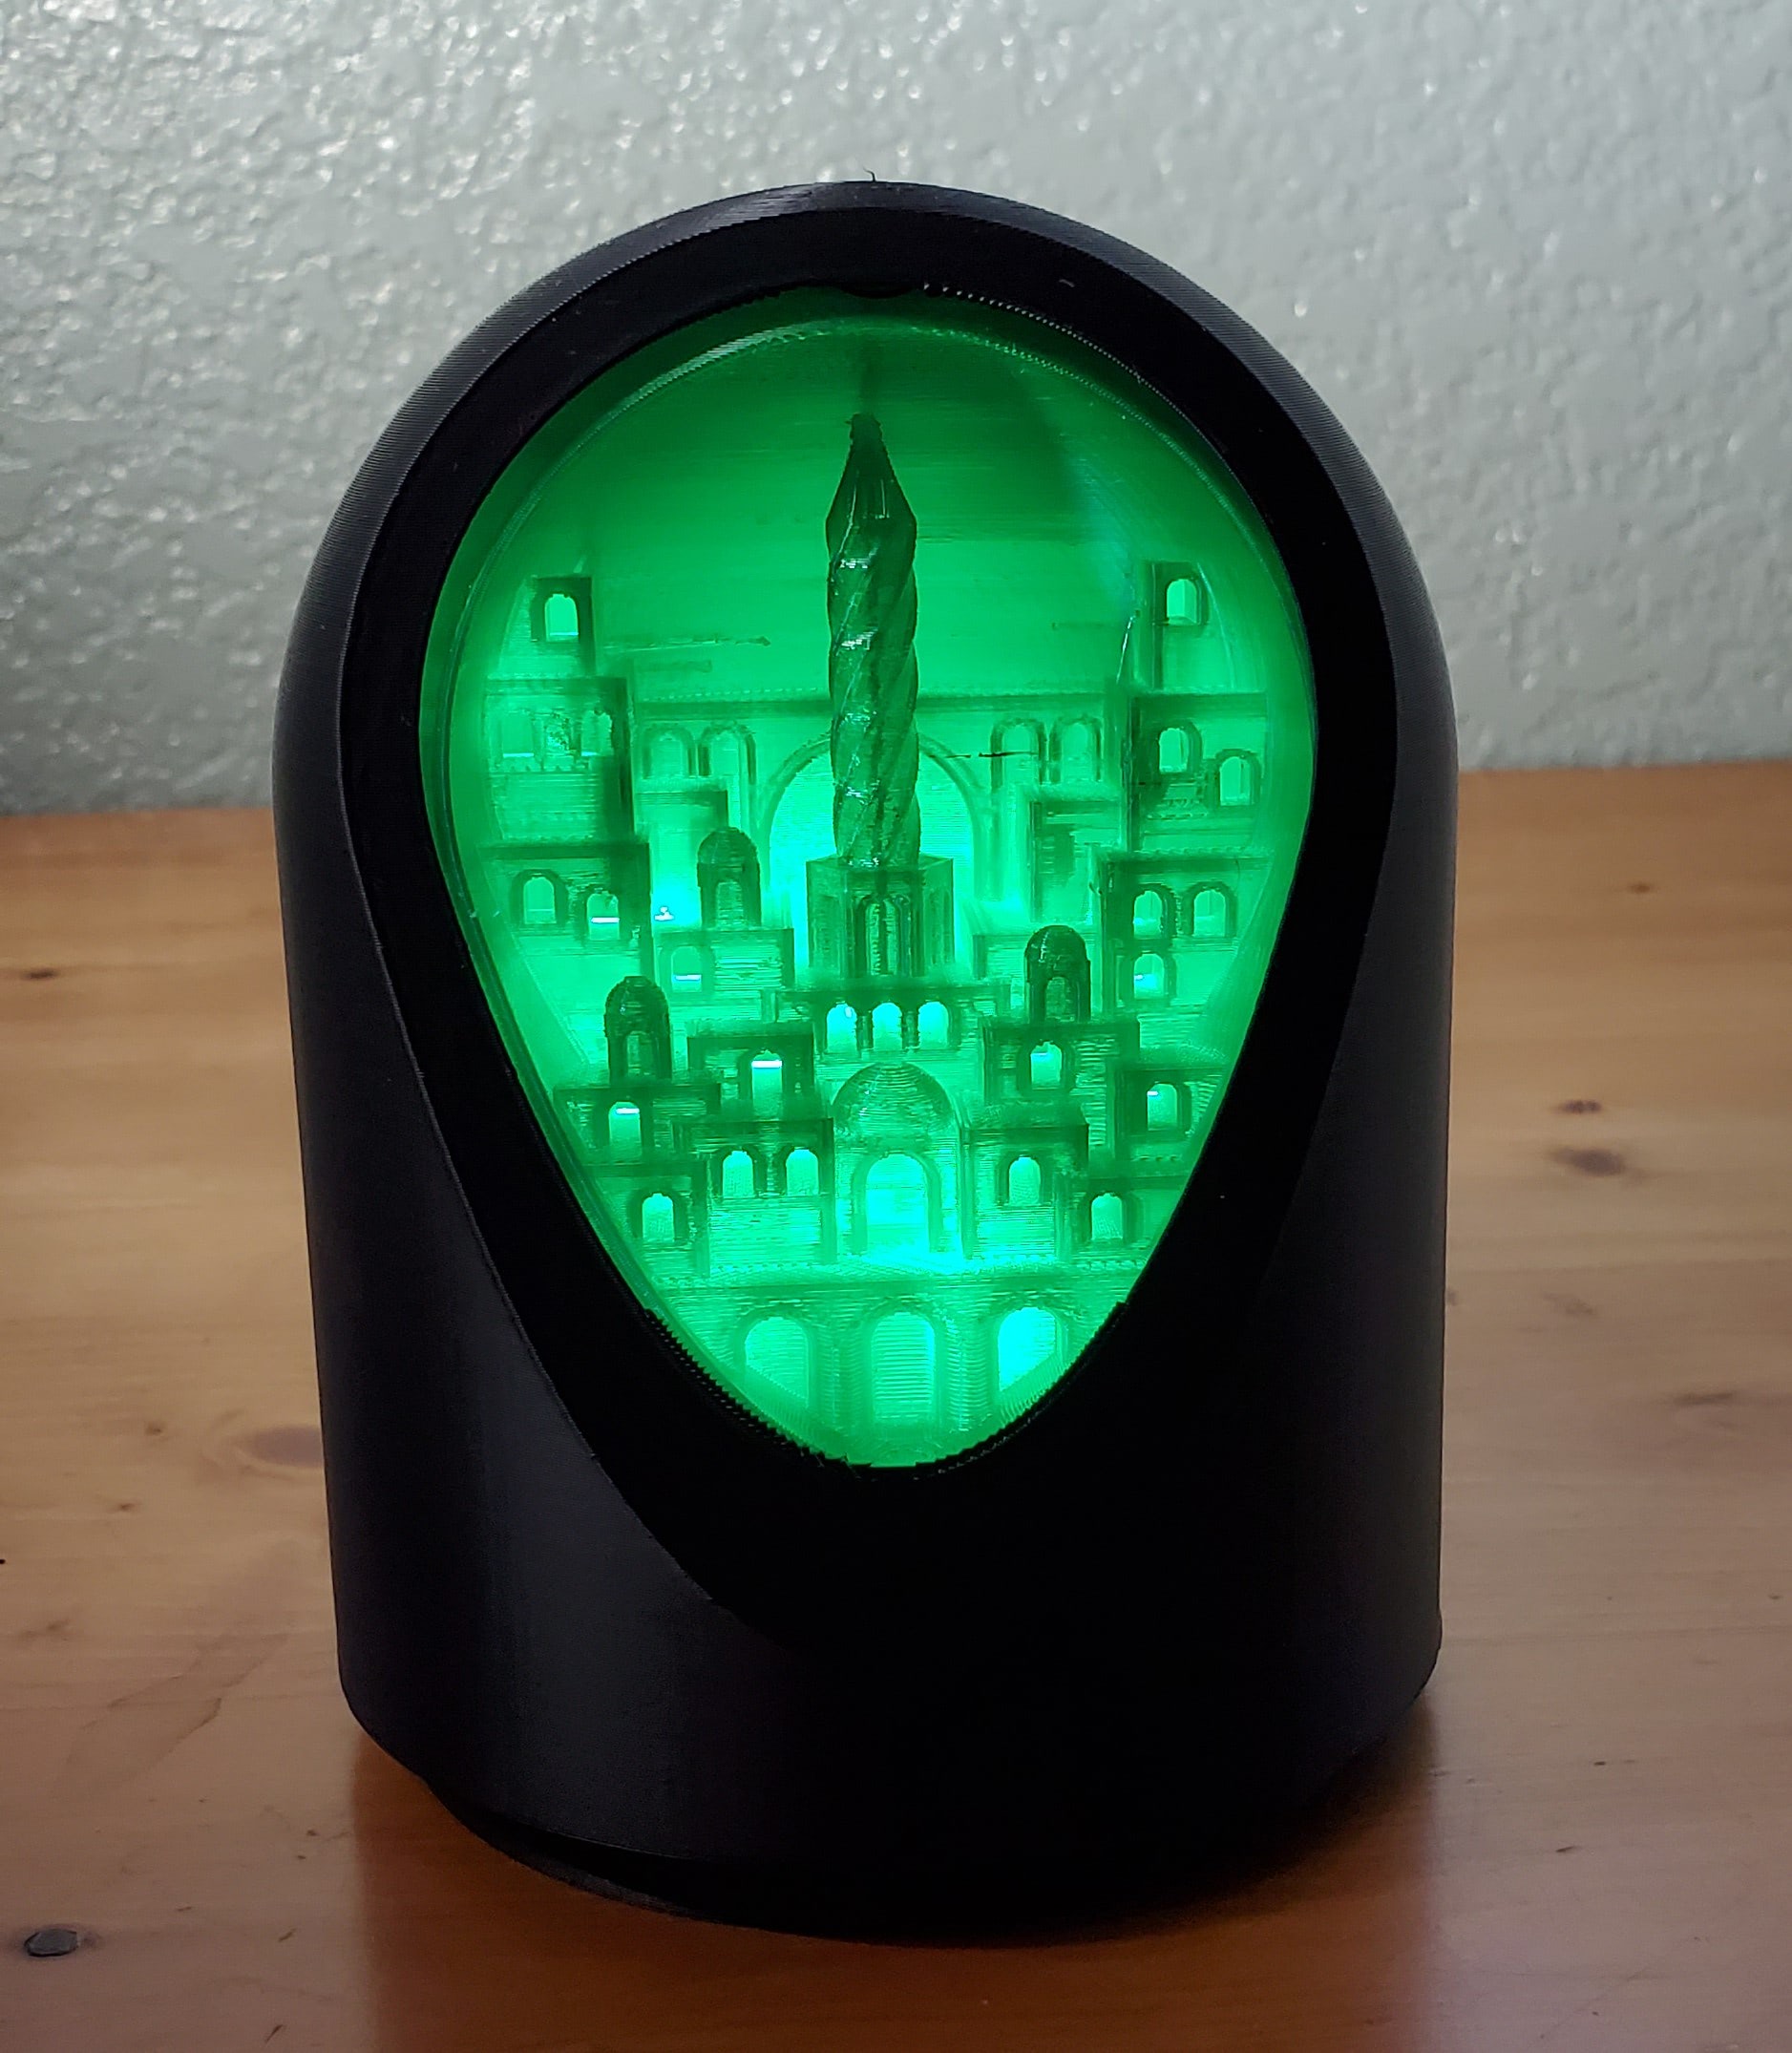
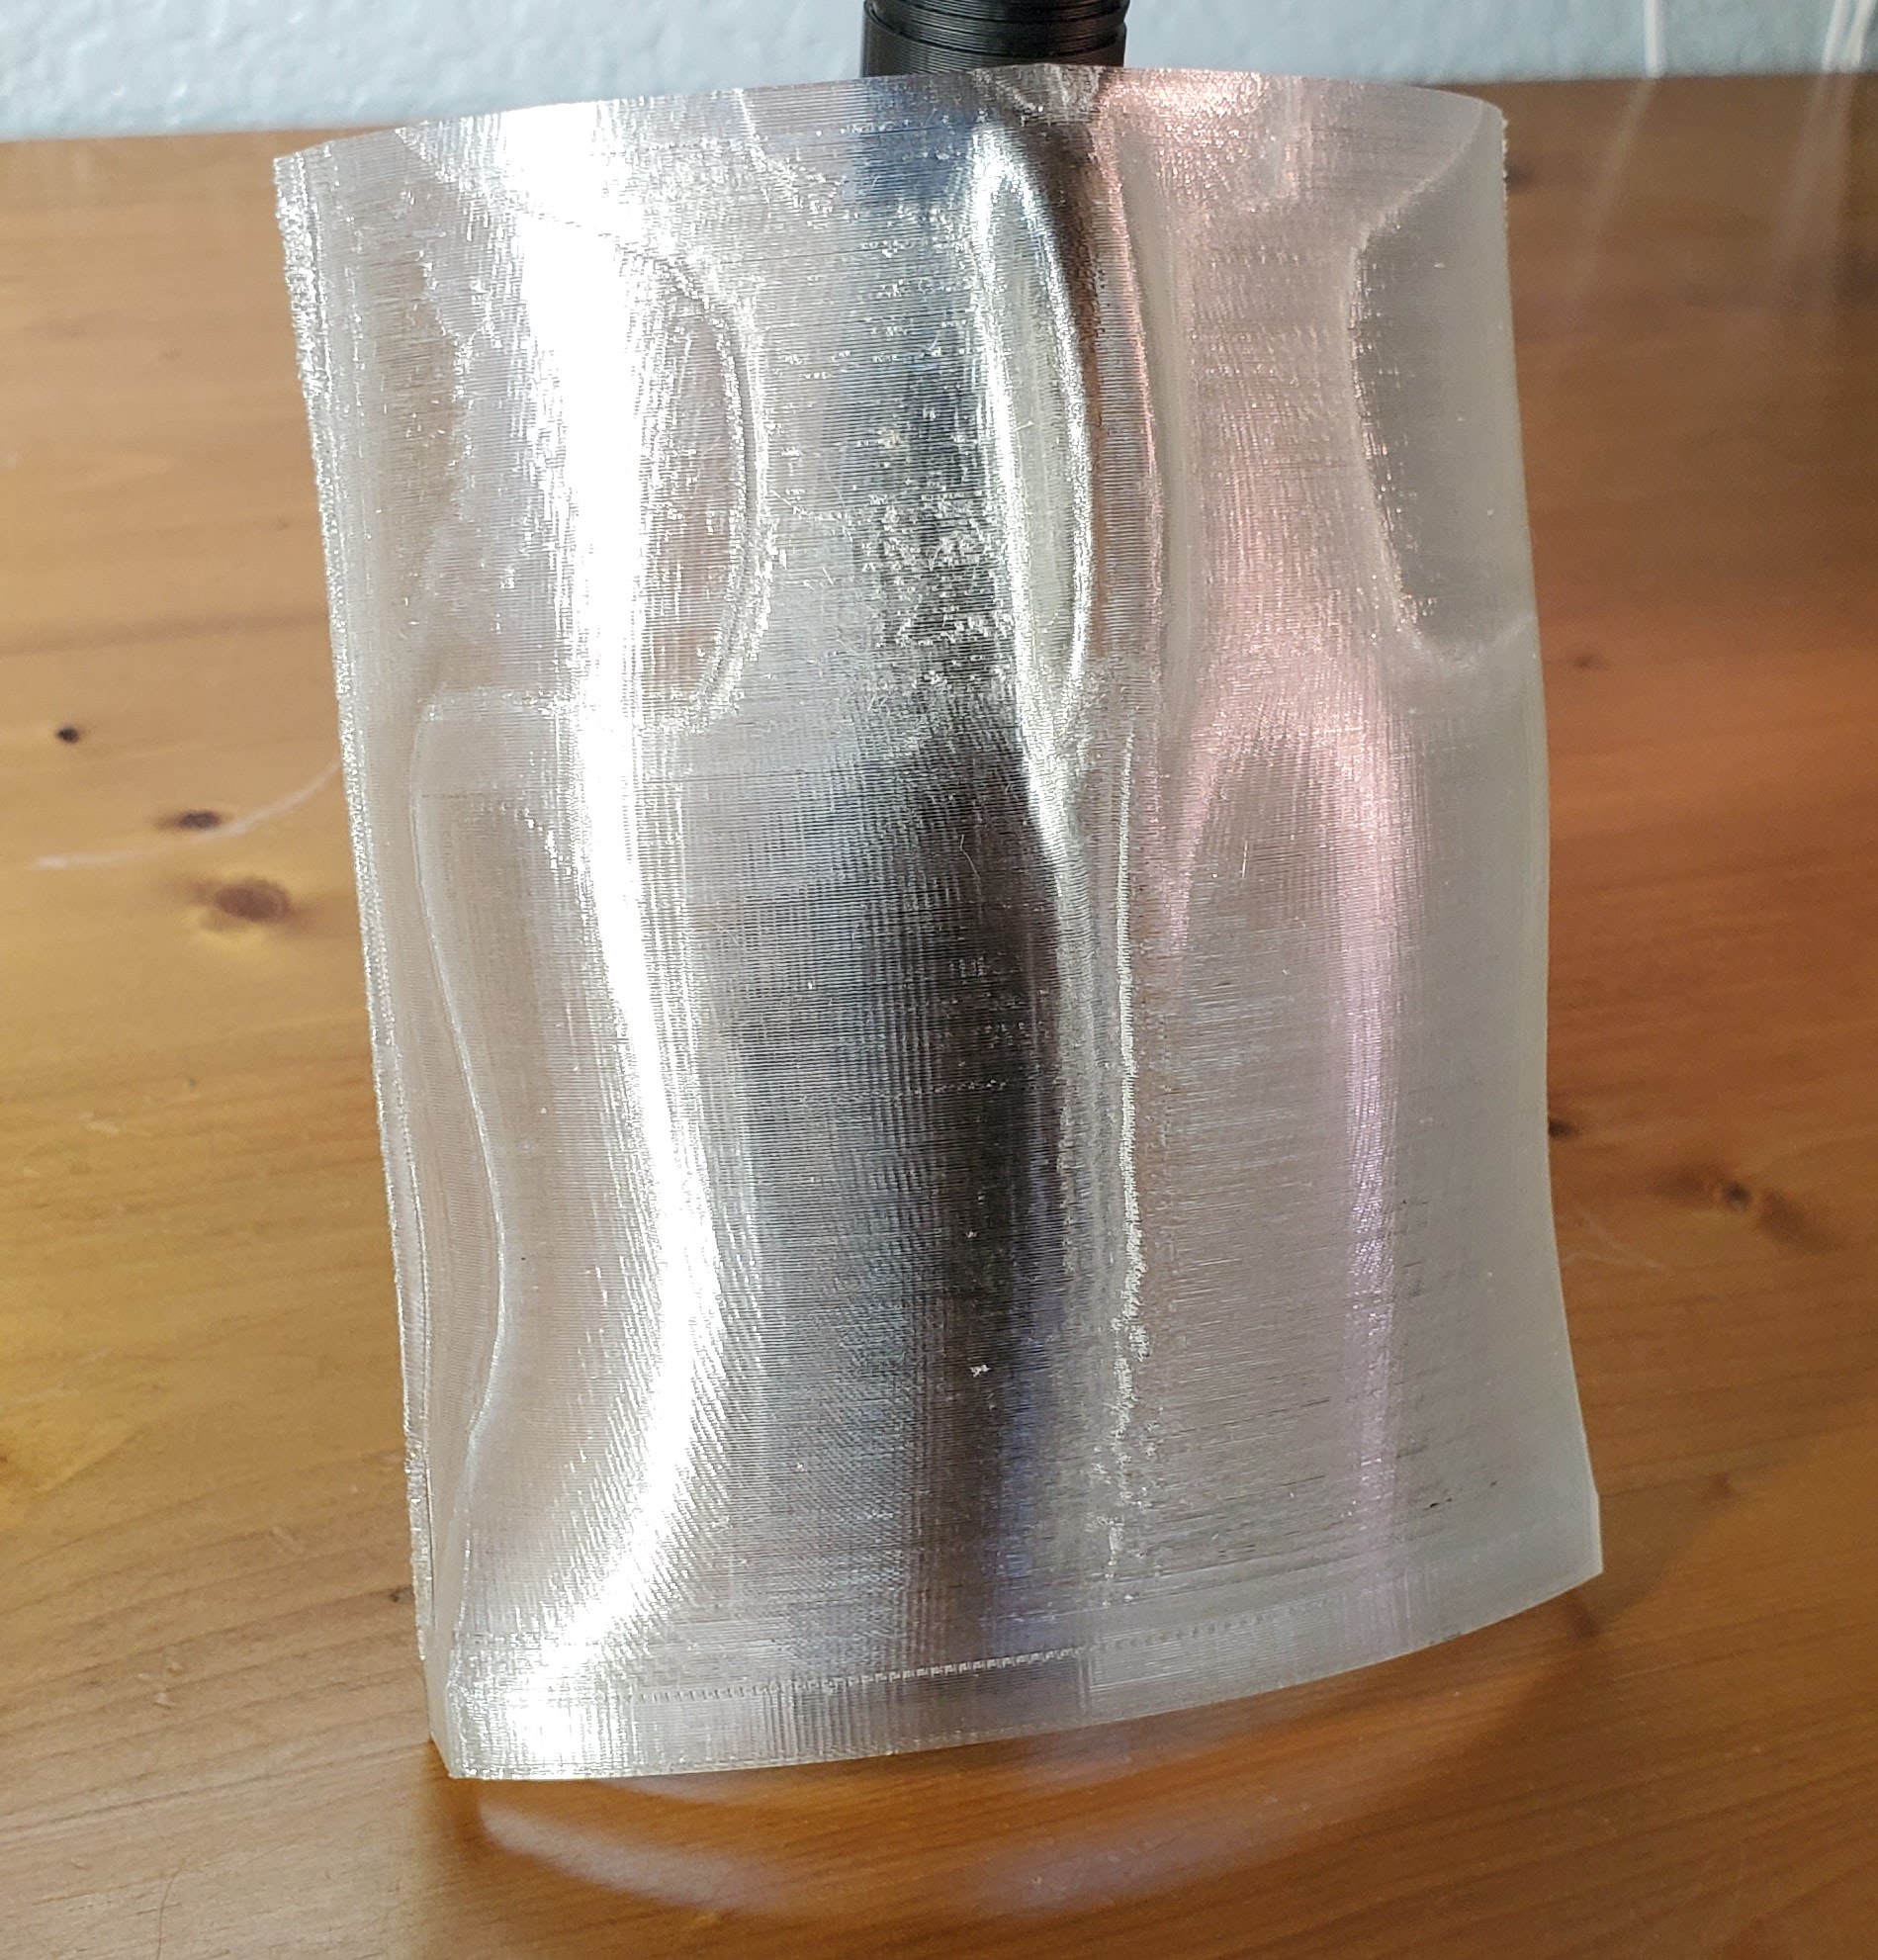
As you can see, it came out wonderfully. The outer shell is in ABS. And while I had the ABS loaded, I decided to test whether moving parts would come out working. This Machine Canister served as a useful benchmark.

I even scaled the model down to 80% to really test the tolerances and it still came out of the printer working smoothly.
Have a look:

Finally, I had some TPU to try out. Since it’s clear TPU, I printed a prototype of a mask I was working on.
Of course, it printed just fine as well. At first, I had the bed too close because it has to be adjusted when changing between the surfaces. That caused the filament to back up and get twisted by the drive gear in the extruder (TPU being very flexible and soft is quite prone to this issue). This required me to open up the extruder housing to remove the filament, and thankfully it’s incredibly easy to remove the extruder motor with the included Alen key to gain access to the hotend. Only two screws hold the housing on and there are another two for the extruder.
The whole process of disassembly, removing the filament, and reassembly took about 10 minutes.
My Verdict
It’s clear at this point that the Guider 2S is not being overbilled as an industrial-grade 3D printer. It is one. The requirements of an industrial printer are: accuracy, repeatability, dependability, and the ability to print with industry-standard materials. Having had the printer for just two weeks, I can’t speak for its long-term dependability, but I did get to experience what it’s like to work on the extruder and it’s remarkably easy to service compared to most printers. As for the rest, I can definitively say it meets all the other requirements. The print quality is the best I’ve seen, and I’m sure I could have printed even higher resolutions. Every print, even in different materials, would come out without fail. And most importantly, being able to print with functional materials like PACF right out of the box is a huge value add for small manufacturing and design businesses. On top of all that, the Guider 2S is whisper quiet, definitely quiet enough for an office with the lid on. And it’s very user friendly. The FlashPrint software is rather robust with the amount of parameters that can be changed but not to the point of being overwhelming, and the interface is intuitive with descriptions that make sense. The predefined material profiles all worked as they should, and they tolerated layer height tweaks just just fine. My gripes with this printer are trivial, like the probe/first layer height issue and the video monitoring not working through the FlashPrint software, but those gripes pale in comparison to all the things I like about it.